- Home
- How to Store Dehydrated Food Safey for Long Term Storage
- Plastic Wrap Guide: How To Wrap Vacuum-Sealed Packages
Plastic Wrap Guide

Susan Gast | Author and blogger at Bored Boomers, Beesville Books, A New Sober You and Easy Food Dehydrating
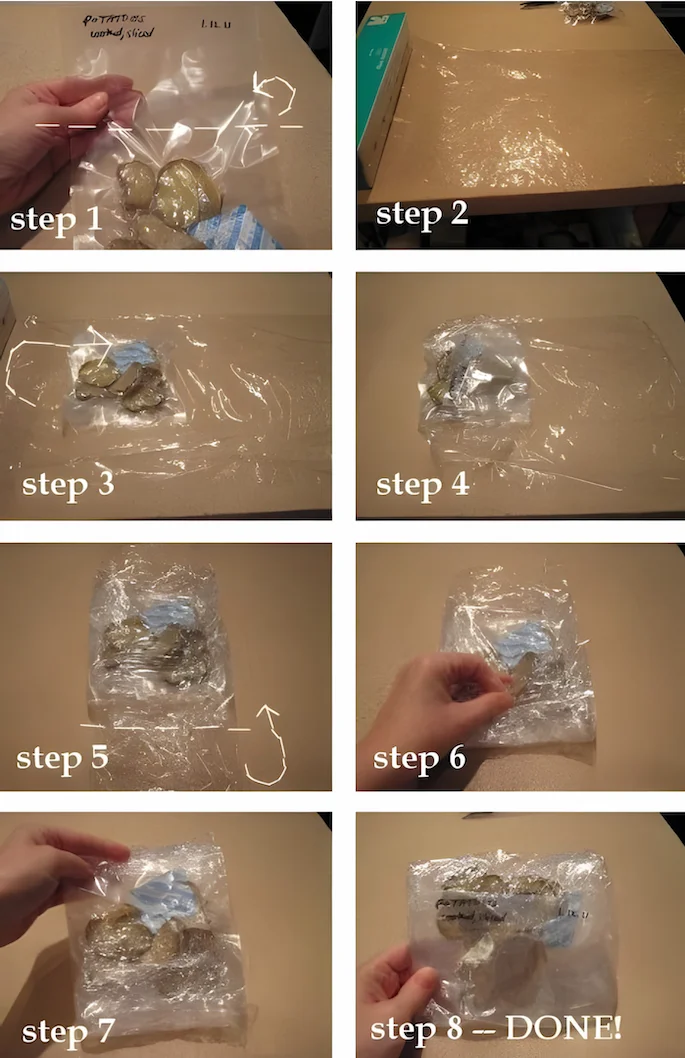
Here's an easy plastic wrap guide—in pictures! Why use plastic wrap after dehydrating and storing food? It helps protect sharp/crisp dehydrated foods from puncturing other bags while inside the Mylar bags. Read the descriptive steps below the photos.
A Quick Plastic Wrap Guide Pictorial
A Quick Plastic Wrap
Guide Pictorial

Here's an easy plastic wrap guide—your dehydrated fruit and
vegetables may need this optional plastic wrap protection—easy to do
as shown in the eight photographs below!
- Step 1 - Fold the excess vacuum bag top underneath
- Step 2 - Pull out 2 ft approx. plastic wrap. Place the folded
package down with the bag's fold facing the newly torn wrap edge (that's
on your left)
- Step 3 - Fold the wrap over the top
- Step 4 - Continue folding/wrapping the package to your right
- Step 5 - Fold excess 'wings' see the dotted line!
- Step 6 - From bottom upwards...
- Step 7 - ... and fold the top wing down
- Step 8 - Turn your package over so you can see your hand-written contents on the vacuum bag through the wrap!
Dare I Now Say "It's a Wrap"?!
NOTE: When you have taken out a packet of dehydrated food to use, don't throw away the plastic wrap!
Instead, wrap it around an old cardboard paper-towel roll tube or fold the plastic wrap gently—and USE IT AGAIN!
Fold back about 1/2" of it from the edge so you can use it as a "tab" ... no more picking at the edge to FIND the edge! I do the same thing for scotch-tape!
- 400 square foot roll. Clings tight, easy-to-handle wrap
- Microwave safe
- Keeps food fresh
- 200 square foot roll. Clings tight, easy-to-handle wrap
- Microwave safe
- Keeps food fresh
As an Amazon Associate, I earn commission from qualifying purchases. The price you pay does not increase. Read disclosure here.
Why Are We Doing All This?
When you have dehydrated your food, it can become brittle and pretty sharp. Just give a quick tap on any of your dehydrated food bags after vacuum-sealing. You'll see that they're pretty hard, right?
Always use good quality food vacuum sealer bags. Check out the Amazon suppliers link(s) on the vacuum bags'
page at Amazon.
So that's why we do all this: to prevent the dehydrated food packets from puncturing the bag that's next to it in the Mylar bag
Wrap the vacuumed bag first with plastic wrap, and follow the pictorial guide, above!
The Storing of Dehydrated Food Sequence
- Dehydrate the food (condition it too), then vacuum seal it with a 100cc oxygen absorber having been tucked in before drawing out the air.
- Wrap the package in plastic wrap to soften the corners to avoid puncturing other bags.
- Put those packages in the Mylar bags along with a 300cc oxygen absorber in the Mylar bag.
- Seal the Mylar bag, and write on it the bag’s contents, and the date.
- Put these Mylar bags inside the bins and buckets with a 2000cc oxygen absorber added before putting on their lids.
Don't forget to grab your free Six Simple Steps eBook! It’s packed with tips for dehydrating everything from fruits and veggies to dog treats. Get it here.
Before You Go...
If you like the content, please give me some love by clicking on the 🩷 in the lower right hand corner (on just about all my pages). This signals to me that you find it enjoyable and useful. Thank you so much!


