- Home
- How To Dehydrate Vegetables
- How to Dehydrate Kale
How to Dehydrate Kale 3 Ways to
Make Crispy Kale Chips & Kale Powder

Susan Gast | Author and blogger at Bored Boomers, Beesville Books, A New Sober You and Easy Food Dehydrating
Learning how to dehydrate kale is a great way to preserve this nutrient-packed veggie for months while making it more versatile in the kitchen.
Whether you’re craving crispy kale chips for a healthy snack or want to make kale powder to boost smoothies and soups, dehydrating kale is simple and rewarding.
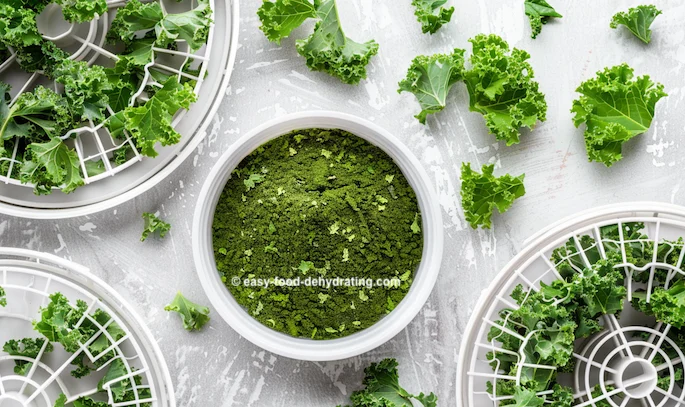
In this guide, you'll discover three easy methods to dry kale: Using an electric food dehydrator, a regular oven, or sun drying for a natural approach. We’ll also cover the best kale varieties for drying, flavor-enhancing tips, and the best ways to store your dehydrated kale for long-lasting freshness.

Frequently Asked Questions
Dehydrating kale is a fantastic way to preserve its nutrients and enjoy it in various forms—crispy chips, powder, or flakes. Below are some common questions people ask about how to dry kale at home.
How to dehydrate kale?
How to dehydrate kale?
The best way to dehydrate kale depends on your equipment. On this page, you’ll learn three methods: using a food dehydrator, oven, or even sunshine. Scroll down for step-by-step instructions!
How to make dried kale chips from kale leaves?
How to make dried kale chips from kale leaves?
Want perfectly crispy kale chips? Head to our "Homemade Kale Chips Recipe for Best Kale Chips" further down the page for a simple, flavorful method.
Why do people add nutritional yeast to kale recipes?
Why do people add nutritional yeast to kale recipes?
There are two main reasons:
- Flavor boost – Nutritional yeast has a nutty, cheesy flavor that makes kale chips taste more savory without artificial additives. It’s a popular choice for plant-based eaters who want a "cheesy" snack.
- Nutritional benefits – It’s packed with B vitamins (including B12), is a complete protein, and provides essential amino acids.
💡 Do I have to use nutritional yeast? Nope! It doesn’t affect the drying process, and not everyone loves the taste. You can season kale with herbs, spices, or seeds instead.
How long does it take to dehydrate kale?
How long does it take to dehydrate kale?
Drying times vary depending on the method:
- Dehydrator – 4 to 10 hours (chips vs. powder)
- Oven – 1 to 5 hours
- Sun drying – Several days to a week, depending on conditions
Check out the detailed How to Dehydrate Kale section below for specific times and tips!
Kale Nutrition Information
VITAMINS: Vitamin A, Vitamin B6, Vitamin C, Vitamin K, and Folate.
MINERALS: Calcium, Potassium, Magnesium, Manganese, Iron, Phosphorus, Sodium, and Zinc.
Kale is one of those fantastic anti-aging foods, and Linda Robison shares the top food "skin loving" contenders here, plus read about the benefits of kale here.
Dehydrate Kale Leaves 3 Ways
1. An electric dehydrator: Best for convenience.
2. A regular oven: Best for quick drying.
3. Sun: Most natural, but slower.
Fresh Kale Varieties
Not all kale varieties dehydrate the same way! Some are better for crispy chips, while others are ideal for powder. Here’s a quick guide:
Best for Kale Chips:
- Curly Kale – The most common type; holds up well to drying.
- Lacinato (Dinosaur) Kale – Slightly thinner than curly, dehydrates evenly.
- Winterbor Kale – Hardy, slightly sweet, and crisps up well.
Best for Kale Powder:
- Prizm Kale – Naturally delicate; dries quickly for easy grinding.
- Red Russian Kale – Mild flavor and thin leaves make it great for powder.
- Siberian Kale – Slightly sweeter, with softer leaves that dry fast.
💡 Tip: Thicker varieties like Curly Kale take longer to dry but result in heartier chips, while thinner varieties like Prizm Kale are best suited for powder. Adjust drying times accordingly!

How to Prepare Kale Leaves for Dehydrating
There's no single "best" way to prepare kale, as it depends on how you intend to use it! Here's a breakdown of different preparation methods and their benefits:
Dehydrating Different Kale Varieties
Not all kale varieties dry at the same rate. Factors like leaf thickness, water content, and texture affect how long it takes to dehydrate.
- Thicker, curly varieties (Curly Kale, Winterbor Kale): Take longer to dry but make sturdy, crunchy chips. Best sliced thinner for even dehydration.
- Thinner, tender varieties (Prizm Kale, Red Russian Kale, Siberian Kale): Dry faster but can become too brittle for chips. Best for powder or adding to soups/stews.
- Mild-flavored kale (Red Russian, Siberian): Less bitter when dried, requiring less seasoning.
- Bitter varieties (Curly Kale, Lacinato): Benefit from seasoning or blanching before drying.
💡 Drying Tip: To prevent burning, monitor thinner leaves closely, especially if making kale chips. For powder, let thicker leaves dry longer until completely crisp before grinding.
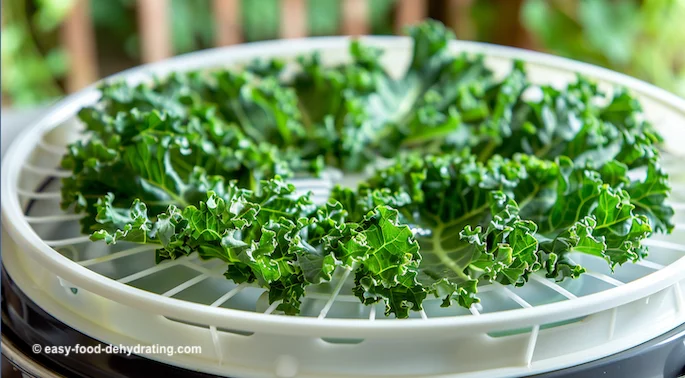
How to Dehydrate Kale in a Dehydrator
- Wash & Dry – Rinse kale thoroughly, then pat dry with paper towels or use a salad spinner.
- Chop – Cut into desired sizes: large for texture, small for faster drying, or crumble for powder.
- Arrange – Spread kale in a single layer on dehydrator trays.
- Set Temperature – 135°F
Kale chips: 4–8 hours, until crispy and brittle.
Kale powder: 6–10 hours, until fully dry and crumbly.
💡 Check doneness: Chips should snap easily, and powder-ready leaves should crumble when rubbed together.
💡 Tip: Use our Fahrenheit to Celsius converter here on our site!

How to Dehydrate Kale in a Regular Oven
- Prep the Kale – Wash, dry thoroughly, and remove tough stems. Chop to your preferred size.
- Optional – Lightly coat with oil for chips (skip for powder). Season if desired.
- Arrange & Dry – Spread in a single layer on a parchment-lined baking sheet.
- Set Oven – Use the lowest temperature possible (ideally 140°F). If your oven doesn't go that low, crack the door open slightly for airflow.
- Monitor Closely –
Kale chips: 1–3 hours, turning occasionally until crisp.
Kale powder: 3–5 hours, ensuring full dryness before grinding.
💡 Pro Tip: Rotate baking sheets halfway through and check frequently toward the end to prevent burning.
💡 Tip: Use our Fahrenheit to Celsius converter here on our site!
How to Dehydrate Kale in the Sunshine
- Prep the Kale – Wash, dry thoroughly, and remove stems. Chop into bite-sized pieces.
- Optional – Blanch briefly (30 sec in boiling water, then ice water) to preserve color.
- Arrange & Dry – Spread on a clean drying rack or thread pieces onto string. Place in direct sunlight in a well-ventilated area, protected from dust and insects.
- Monitor Daily – Move kale as the sun shifts and bring indoors at night to prevent moisture buildup.
- Check Doneness – Drying can take several days to a week depending on weather. Chips: Should be crispy and snap cleanly. Powder: Leaves should be fully dry and crumble easily.
💡 Sun-Drying Considerations: This method depends on climate—humidity can cause mold, and wind or insects may pose issues. Dehydrators or ovens provide more consistent results.

Homemade Kale Chips Recipe for the Best Kale Chips!
Here is a great recipe for your dehydrator to make perfectly crispy and customizable kale chips:
Dehydrated Kale Chips: Flavorful & Crunchy!
Ingredients:
- 1 bunch curly kale, washed and thoroughly dried
- 1 tablespoon olive oil
- 1/2 teaspoon salt
- 1/4 teaspoon black pepper
- Optional Flavor Twists:(Choose one or combine!)
Spicy: 1/4 teaspoon chili flakes
Mediterranean: 1/2 teaspoon dried oregano, 1/4 teaspoon garlic powder
Sesame Ginger: 1 tablespoon sesame oil, 1/2 teaspoon grated ginger
Lemon Pepper: 1/4 teaspoon dried lemon zest, 1/4 teaspoon ground black pepper
How to Make Delicious Dehydrated Kale Chips:
- Prepare the kale: Remove stems and tear or chop leaves into bite-sized pieces (smaller for crispier chips).
- Season: In a large bowl, toss the kale with olive oil, salt, pepper, and your chosen flavor twist ingredients (optional). Try to evenly coat the kale leaves.
- Dehydrate: Spread out your seasoned kale in a single layer on your dehydrator trays. Don't overcrowd.
- Set the temperature: Crispy chips: 130°F for 4-6 hours. Soft chips: 115°F for 6-8 hours.
- Monitor and adjust: Check the chips periodically. Start flipping them halfway through drying for even browning. Adjust drying time based on thickness and desired crispness.
- Test for doneness: A fully dried chip should snap cleanly when bent without showing any moisture or flexibility.
- Cool and enjoy: Let the chips cool completely on the trays before storing them in an airtight container at room temperature. They will stay crispy for up to 3 days.
💡 Tip: Use our Fahrenheit to Celsius converter here on our site!
Storing Dehydrated Kale
Whether you've made kale powder or kale chips, use food vacuum sealer bags, and/or Mason jars to store your kale in. Remember to add a 100cc oxygen absorber into the bag or jar before drawing the air out.
How to Rehydrate Dehydrated Kale
Rehydrating kale is simple and depends on whether you’re using chips or powder.
For Dried Kale Chips:
- Soak: Place in warm water for 10–15 minutes (best for soups & stews).
- Microwave: Sprinkle with water and heat on low for 15–30 seconds (check every 10 sec).
- Oven Steam: Wrap in foil and warm at 300°F for 5–10 minutes to retain texture.
💡 Tip: Use our Fahrenheit to Celsius converter here on our site!
For Kale Powder:
- Water: Mix with a small amount of water to form a paste (use in dips, dressings, or sauces).
- Broth: Rehydrate with hot broth for extra flavor (great for soups & stews).
- Yogurt: Stir into yogurt for a protein-packed boost.
- Baking: Add directly to batters (no rehydration needed).
💡 Tip: Use just enough liquid to reach your desired consistency—rehydrated kale won’t be as crisp as fresh but still retains its nutrients and flavor.
Thanks for stopping by to learn how to dehydrate kale!
Get Your Free Guide to Dehydrating Like a Pro!
Don't forget to grab your free Six Simple Steps eBook! It’s packed with tips for dehydrating everything from fruits and veggies to dog treats. Get it here.
Before You Go...
If you like the content, please give me some love by clicking on the 🩷 in the lower right hand corner (on just about all my pages). This signals to me that you find it enjoyable and useful. Thank you so much!


